This widget arranges its children in a horizontal direction on the screen. In other words, it will expect child widgets in a horizontal array. If the child widgets need to fill the available horizontal space, we must wrap the children widgets in an Expanded widget.
A row widget does not appear scrollable because it displays the widgets within the visible view. So it is considered wrong if we have more children in a row which will not fit in the available space. If we want to make a scrollable list of row widgets, we need to use the ListView widget.
We can control how a row widget aligns its children based on our choice using the property crossAxisAlignment and mainAxisAlignment. The row’s cross-axis will run vertically, and the main axis will run horizontally. See the below visual representation to understand it more clearly.
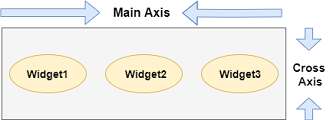
Note: Flutter row widget has several other properties like mainAxisSize, textDirection, verticalDirection, etc. Here, we will discuss only mainAxisAlignment and crossAxisAlignment properties.
We can align the row’s children widget with the help of the following properties:
- start: It will place the children from the starting of the main axis.
- end: It will place the children at the end of the main axis.
- center: It will place the children in the middle of the main axis.
- spaceBetween: It will place the free space between the children evenly.
- spaceAround: It will place the free space between the children evenly and half of that space before and after the first and last children widget.
- spaceEvenly: It will place the free space between the children evenly and before and after the first and last children widget.
Let us understand it with the help of an example where we are going to align the content such that there is an even space around the children in a row:
import 'package:flutter/material.dart';
void main() { runApp(MyApp()); }
class MyApp extends StatelessWidget {
@override
Widget build(BuildContext context) {
return MaterialApp(
home: MyHomePage()
);
}
}
class MyHomePage extends StatefulWidget {
@override
_MyHomePageState createState() => _MyHomePageState();
}
class _MyHomePageState extends State<MyHomePage> {
@override
Widget build(BuildContext context) {
return Scaffold(
appBar: AppBar(
title: Text("Flutter Row Example"),
),
body: Row(
mainAxisAlignment: MainAxisAlignment.spaceEvenly,
children:<Widget>[
Container(
margin: EdgeInsets.all(12.0),
padding: EdgeInsets.all(8.0),
decoration:BoxDecoration(
borderRadius:BorderRadius.circular(8),
color:Colors.green
),
child: Text("React.js",style: TextStyle(color:Colors.yellowAccent,fontSize:25),),
),
Container(
margin: EdgeInsets.all(15.0),
padding: EdgeInsets.all(8.0),
decoration:BoxDecoration(
borderRadius:BorderRadius.circular(8),
color:Colors.green
),
child: Text("Flutter",style: TextStyle(color:Colors.yellowAccent,fontSize:25),),
),
Container(
margin: EdgeInsets.all(12.0),
padding: EdgeInsets.all(8.0),
decoration:BoxDecoration(
borderRadius:BorderRadius.circular(8),
color:Colors.green
),
child: Text("MySQL",style: TextStyle(color:Colors.yellowAccent,fontSize:25),),
)
]
),
);
}
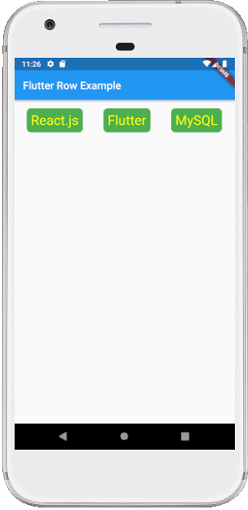
} Output:
When we run this app, we should get the UI as the below screenshot.