In this section, we are going to learn how you can create a complex user interface using both single and multiple child layout widgets. The layout framework allows you to create a complex user interface layout by nesting the rows and columns inside of rows and columns.
Let us see an example of a complex user interface by creating the product list. For this purpose, you need first to replace the code of main.dart file with the following code snippet.
import 'package:flutter/material.dart';
void main() => runApp(MyApp());
class MyApp extends StatelessWidget {
// It is the root widget of your application.
@override
Widget build(BuildContext context) {
return MaterialApp(
title: 'Flutter Demo Application', theme: ThemeData(
primarySwatch: Colors.green,),
home: MyHomePage(title: 'Complex layout example'),
);
}
}
class MyHomePage extends StatelessWidget {
MyHomePage({Key key, this.title}) : super(key: key);
final String title;
@override
Widget build(BuildContext context) {
return Scaffold(
appBar: AppBar(title: Text("Product List")),
body: ListView(
padding: const EdgeInsets.fromLTRB(3.0, 12.0, 3.0, 12.0),
children: <Widget>[
ProductBox(
name: "iPhone",
description: "iPhone is the top branded phone ever",
price: 55000,
image: "iphone.png"
),
ProductBox(
name: "Android",
description: "Android is a very stylish phone",
price: 10000,
image: "android.png"
),
ProductBox(
name: "Tablet",
description: "Tablet is a popular device for official meetings",
price: 25000,
image: "tablet.png"
),
ProductBox(
name: "Laptop",
description: "Laptop is most famous electronic device",
price: 35000,
image: "laptop.png"
),
ProductBox(
name: "Desktop",
description: "Desktop is most popular for regular use",
price: 10000,
image: "computer.png"
),
],
)
);
}
}
class ProductBox extends StatelessWidget {
ProductBox({Key key, this.name, this.description, this.price, this.image}) :
super(key: key);
final String name;
final String description;
final int price;
final String image;
Widget build(BuildContext context) {
return Container(
padding: EdgeInsets.all(2),
height: 110,
child: Card(
child: Row(
mainAxisAlignment: MainAxisAlignment.spaceEvenly,
children: <Widget>[
Image.asset("assets/" + image),
Expanded(
child: Container(
padding: EdgeInsets.all(5),
child: Column(
mainAxisAlignment: MainAxisAlignment.spaceEvenly,
children: <Widget>[
Text(
this.name, style: TextStyle(
fontWeight: FontWeight.bold
)
),
Text(this.description), Text(
"Price: " + this.price.toString()
),
],
)
)
)
]
)
)
);
}
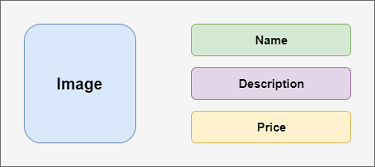
} In the above code, we create widget ProductBox that contains the details of the product, such as image, name, price, and description. In the ProductBox widget, we use the following child widgets: Container, Row, Column, Expanded, Card, Text, Image, etc. This widget contains the following layout:
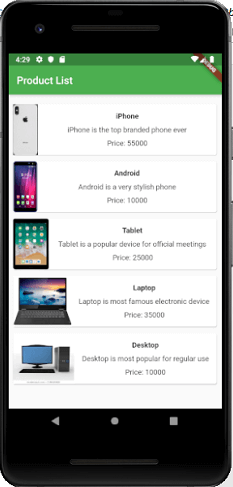
Output
Now, when we run the dart file in the android emulator, it will give the following output.